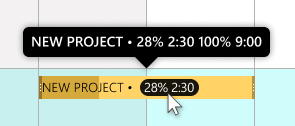
Used Time is a way to manually insert and track a Task’s progress. The feature allows Users to input how much time was spent working on the Task, and helps provide a visual clue to how much is left. Discover how to track a Task’s Used Time with this feature.
Must Know
- All Owners, Admins and Users with Resources’ Task view or add/edit rights can insert and track their used time.
- Only Owners and Admins can delete the Used Time interval entries.
- Multiple Used Time entries (with description) per Task is allowed.
- Each entry is timestamped and can be submitted with a text description. This helps to track how the task was carried out and what's already been done to the Task.
- Used Time can be visually tracked from the Taskbar, if the Task Edit Dialog and Used Time section is closed. Either with an actual percentage configured in Settings > Taskbar; or via a lighter bar that illustrates proportion of completion under View > Visibility Settings.
Inserting Used Time Entries
- Click on a Taskbar in a View. This will open the Task Edit Dialog
-
Click on Used time in the toolbar.
- Select a date for the entry and insert hours and minutes. Add comments below (optional)
- Click Add time entry when complete.
- The total Used Time entries with timestamps and the User who added it, will be displayed to the right.
- If the Task is finished, click Complete task. The planner will calculate the missing hours for you. Make sure to hit Add time entry to save!
- Click the back button to navigate back to the Task Edit Dialog. The Used Time icon will have a green square indicating that there are entries made.
Visually Tracking Used Time
You can always check the Used Time Log to see how much of the Task is already done. But there’s also 2 options for seeing this information on the Taskbar, without having to open the Task Edit Dialog or Used Time section.
Used Time Written as a Number and Percentage

If you wish to see the written information on the taskbar, this can be done from Settings > Taskbar. Choose if you want to see the percentage (Used time %) or the actual time (Used time in hh:mm). You can also choose both!
All Owners and Admins can configure this setting. And these settings will be displayed across the whole planner.
Used Time as a Visual Representation

It’s also possible to see how your Task is progressing on the Taskbar. As shown above, the percentage is illustrated with a light or dark (depending on the Task color) Task Used Time Graph overlaid on the Taskbar. This can be disabled or enabled for each individual View via View Visibility > Task Progress (Used Time Visualization).
All Owners, Admins and Users with the View's Edit rights have the option to configure this visualization. Do this within the View Visibility > Task Progress (Used Time) Visualization section.
You have three options to choose from:
Show progress percentage - The ration between Used Time and Task Busy Time in %. The Used Time graph will cover the same % of the full Taskbar as the Used Time covers the total Task Busy Time in HH:MM (the length of the Task in business hours and days).
Show progress in calendar time - Task Used Time in calendar time, taking into account the distribution of working time across the calendar time (non-business days and hours included. See the two grayed-out non-business days).
Hide - Hides the light or dark Used Time bar graph from the Taskbar completely.
NB! Both the written Used Time entries (white balloon) and light or dark Used Time bar can be displayed simultaneously!
Reporting with Busy Time
Used Time is especially useful for reports.
For example, compare Busy Time to Used Time to see the difference between planned hours (Busy time) and reality (Used Time). This comparison can give valuable information for future scheduling purposes. For that, you can use "Used time" and "Busy time" Report fields to generate comparative data columns of any of your pieces of data.
Next steps
Used Time is an important feature for time tracking. Find out some tips on using time tracking in your resource management process.